
Wood countertops can make a kitchen pop or flop. Choosing the right finish is essential. It must be hardwearing, long-lasting, and look amazing too. So how do you find a finish that can cope with all three demands?
Choosing the best finish for your wood countertops doesn’t have to be difficult. Several timber types are natural contenders and don’t require special attention. However, as every chef knows, getting the recipe right at the start means less mess later.
Here’s our guide to wood countertops and getting that topcoat treatment right.

Gloss, Matte, or Natural?
The beauty of wooden countertops is that they can look fantastic with any finish. A mirrored coat of gloss varnish can seal the wood and make it reflect light; a matte finish can enhance deep tones. Choose a natural finish to let the timber do the talking.
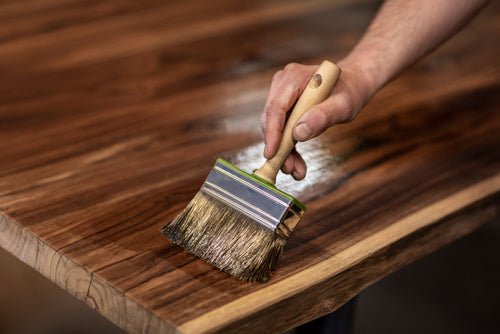
Gloss Over It
Polyurethane and acrylic finishes are brilliant performers when a countertop needs ultimate protection from water and staining or requires food safety confidence once finished. These products provide a classic shine to a countertop but are unforgiving if there is any minor defect.
If your chef is particularly messy and enjoys spreading ingredients, utensils, and water all over the kitchen, then a top-quality varnish might be the best choice for you.
Urethane and acrylic finishes may dull down or peel in time and require refinishing with sandpaper again, however, some are guaranteed for decades of wear and tear.

Which Wood is Your Countertop Made From?
Maple is a fantastic timber to treat with a urethane varnish or lacquer. It has a beautiful bright color that delivers a clean finish that can lift any space. Maple is a superb choice for a Nordic look, or a modern, minimalist kitchen, and works well with other timbers, or painted cabinets.
Matte Match
Mineral oil, or pure tung oil, can be used to deliver a food-safe finish too. It soaks into the grain, repelling water, stains, and heat. Oil-based finishes will wear over time and likely need renewing every three to four years, but often won’t require re-sanding.
When applied, an oil finish might raise the grain a little so be prepared to carry out some light sanding between coats for a smooth finish.
Which Wood Countertop?
The complex grain of oak can look wonderful finished with tung oil. It will require sanding between coats, but your efforts will be rewarded once the work surface is finally finished. Oak is a fabulous traditional timber to use for a timeless look that will last.
The Natural Order
A great finish to use for a natural shine is a wax and oil blended product. The oil enhances the grain, and the wax helps to seal it into the wood. You can go full-on natural with a beeswax base making the job smell amazing too.
Our favorite wax-in-oil product is Real Milk Paint's vegan Wood Wax!
Apply generously with a cloth, following the direction of the grain. Wait a half hour for it to harden off, then remove any build-up with a cloth before buffing.
This finishing method will deepen the finish to the countertop and give it a satin feel, but it will be vulnerable to staining and water damage over time, so will need more maintenance to keep it looking good.
Which Wood Countertop?
American black cherry wood benefits mightily from a natural beeswax and oil mix, deepening to wonderful colors of the timber, and enhancing natural contrasting colorations. Equally at home in modern or traditional kitchen designs, cherry is easy to work with to get a professional finish.
Pro-Tip:
Be sure to clean the countertop thoroughly before applying any finish to it. Use a vacuum cleaner, and a soft, slightly damp cloth to remove any residual sawdust or other material.
The Art of Wood Finish
Your timber choice and wood grain pattern will all feed into choosing the right finish, whether it’s a closed grain, curling maple, or a coarser, rustic oak.
Softwood, such as pine, can take many finishes, such as multi-colored lacquers and paint, but will require more maintenance to stay looking good. Hardwoods age much better when finished properly, and ongoing maintenance demands are much lighter.
But the fine art of wood finishing is all about the work put into preparation. There are countless videos online that make short work of the sanding, filling, and prep that goes into some projects, however, patience always pays dividends.
Sanding Sensibly
There is no substitute for the patience and time needed to get a timber countertop ready for that final finish. Don’t be tempted to use a belt sander, it may be fast, but they are too aggressive!
An orbital sander with fine-grade paper will take longer but will be less liable to leave the countertop uneven. Take your time, and keep the sander moving along the countertop, up and down, back and forth.
Lift the sander off the ends of the countertop and at the corners to avoid rounding off the edges.
Pro-Tip:
While sanding is important, keep it to a minimum by regularly checking progress and consistency.
Grading Papers
If the countertop is already fitted and you are renovating, then you will have to hand-sand the back of the counter by the wall. Use folded sandpaper to get into corners carefully. Start with 80-grade and work gradually through 120-grade to 180.
Take time working through the grades and be sure not to use worn-out paper.
Gentle pressure and constant movement will bring out the best of the grain while sanding. Finish it all off by hand with a block and finest-grade (180 and up) aluminum oxide paper.
Pro-Tip:
If you are staining your countertop, the finer you go with the sanding, the less color will be retained by the grain when the excess is cleaned off. 180-grit paper should be sufficient, and hand-finishing in the direction of the grain will remove any cross-grain scratches.
Crafting Your Kitchen Style
Hardwood is a great choice for kitchen countertops. It is tough, durable, and can last for decades in the busiest home-cooking conditions. When you want to remodel or upgrade a kitchen, the counters are key to making it look good.
At North Castle Hardwoods, we have a wide range of timber materials to choose from. Whether you fancy a pale maple, to help bounce light around the room, or a darker, contrasting American cherry you will find your style in our collection.
When choosing hardwood, it is important to understand the grade of lumber to go for. Your countertops carry a kitchen, providing focus, and contrast to the cabinetry. If you have crafted your own kitchen, the countertops should be the piece-de-resistance, that caps the quality of your achievement.
Enhance and Protect Your Wood
Regular maintenance is key to keeping wooden kitchen countertops looking great for a lifetime of service. Hardwood is resilient and will last for decades when taken proper care of.
Using a product that requires regular renewal without sanding, or other mechanical or chemical means of stripping the existing finish is the recommended way to proceed. It may seem laborious to renew a wax or oil finish every few years, but in the long term, a countertop will become more and more resilient.
A kitchen is a tough environment for timber – just ask any cutting board! A job worth doing is worth doing right the first time.
Start Your Wood Countertop Project Now!
At North Castle Hardwoods, we have the timber and the expertise to help you see your kitchen countertop projects through to superb completion. For excellent, long-lasting results, get in touch today to see how we can help you achieve a professional kitchen countertop finish.


