
Woodturning is a bit like magic! Woodturners shape and craft wood into incredible objects using hand tools as they spin wood blanks on a lathe. It takes skill and patience, but woodturning can transform a raw piece of material into a rich and beautiful heirloom piece. Whether you are creating a seamless bowl, a baseball bat, or a chess piece, the woodturning hobby is highly rewarding.
What is Woodturning?
Woodturning is an ancient craft that was likely practiced in Egypt as far back as the 3rd century B.C. This wonderful artisan practice can't be hurried; there are multiple steps in the woodturning process. But don't be intimidated! Anyone can learn it with patience and practice.
The 8 Steps in the Woodturning Process
1. Select Your Wood
Choose your preferred wood for your project. Consider the wood grain pattern, the color, the hardness of the wood, and its durability.
2. Prepare Your Blank
Cut your wood into a shape that is a little larger than your final piece. Mount the wood on the lathe, either on a faceplate or between the centers.
3. Roughing
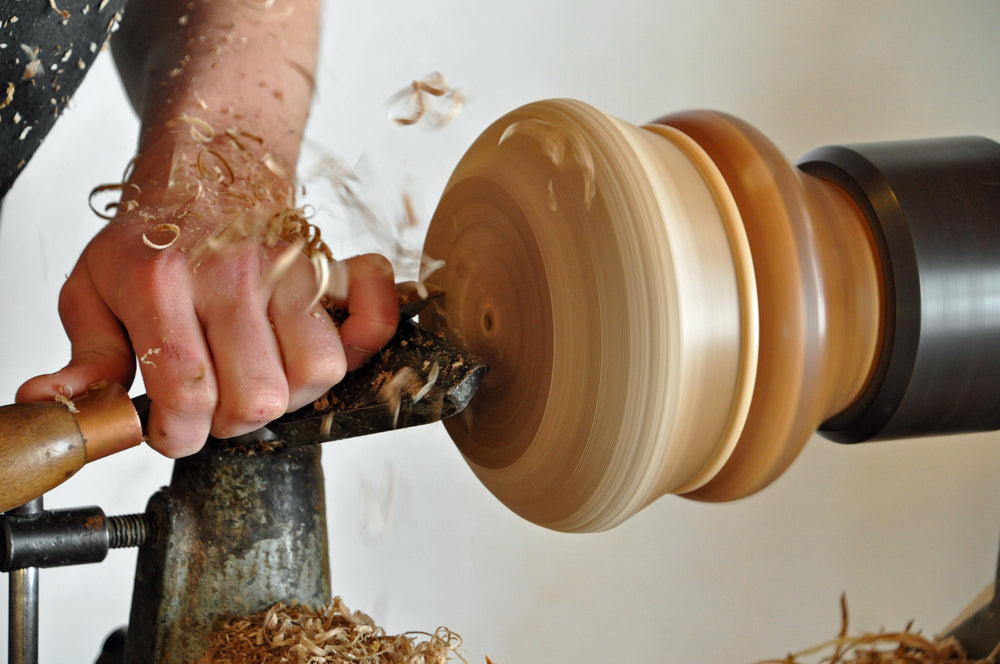
After you turn on your lathe and choose the speed at which to run it, you will use turning tools to shape the wood. The first step is roughing, which uses a roughing gouge to remove excess material and create the base form of your piece.
4. Detailed Shaping
Use different tools to bring your project to life. Perhaps you will use a spindle gouge to add details or a bowl gouge to shape a bowl.
5. Hollowing
If your project is something that needs to be hollowed out (such as a salt shaker or a bowl), you use tools at this stage to hollow the inside while still maintaining the shape you’ve created.
6. Smoothing
This stage creates a smooth surface and removes marks from your other tools.
7. Sanding
This process uses increasingly finer grits of sandpaper to enhance the smoothness of your project and prepare it for finishing.
8. Finishing
Apply a finish to the wood to protect it and enhance its beauty. Types of finishes include oils, waxes, lacquers, or other sealants.
After these steps, you just have to wait for your project to dry before you remove it from the lathe. At this point, give it a final inspection and your project is complete!
Woodturning Techniques
There are two basic techniques when it comes to woodturning. Which you use will depend on what you are hoping to create.
Spindle turning:
In spindle turning, you mount the wood between the headstock and tailstock of your wood lathe. You will then turn the spindle as you work. This technique is typically used for items like candlesticks or rolling pins.
Faceplate turning:
With faceplate turning, you attach the wood to a circular metal plate. The wood blank is secured to the faceplate with screws. This is attached to the headstock of the wood lathe. Woodworkers use this technique to create bowls, platters, or any piece with a wide, flat base. Compared to spindle turning, it allows the woodturner to create larger and/or more asymmetrical pieces.
Tools You Need for Turning Wood
The exact woodturning tools you will need vary based on the project you are working on. Hobby woodturning enthusiasts may wish to invest less money in handheld tools than professionals. At the bare minimum, you will need a lathe, some wood-turning tools, and basic safety gear.
Wood Lathe
Wood lathes hold and rotate the wood. This is the most expensive piece of equipment.
Gouges
There are multiple types of gouges and each one has its place in woodturning. A roughing gouge is essential no matter your type of project. A spindle gouge is used for shaping long, slender pieces. It has a smaller, shallower flute than a roughing gouge, which gives it more control.
Parting Tool
A skew chisel is used to separate a piece from the lathe. It can also quickly reduce the diameter of a round project. Parting tools also may cut grooves when beginning to cut a bead.
Scraping Tools
A scraper removes tool marks from your gouge and helps the turner achieve a smooth finish. These tools remove imperfections in the final shape.
Sandpaper
You will want sandpaper in a variety of grits and sanding tools. Sanding prepares your project for finishing.
Safety Equipment
Invest in your safety when woodturning. A face shield or goggles protect your face and eyes from wood shavings and flying debris. A dust mask guards against irritation from inhaling sawdust. You may want some kind of ear protection since lathes are noisy.
What Can You Make with Woodturning?
 The sky's the limit when it comes to woodturning! From keepsake boxes to lamp bases, you’re only limited by your own imagination. Some common items created through woodturning include:
- Ink pens
- Salt and pepper shakers
- Vases
- Table and chair legs
- Rings and bracelets
- Plates, bowls, trivets
- Rolling pins
- Bottle stoppers
- Mortar and pestle sets
- Musical instruments
- Stair railings
- Chess pieces
The list goes on and on.
What is the Best Wood for Woodturning?
Ash and premium walnut are some of the best hardwoods for woodturning. They are wonderfully stable and give beautiful finishes. These woods also don't tear out easily. Cherry and maple are not quite as stable, but their gorgeous grain patterns result in breathtaking finished products.
Pine is often considered the best softwood for woodturning because it is cheap and easy to handle. However, you will not be creating finely crafted wooden items from this not-so-durable wood. Most items made from pine will fetch a lower price than those made using hardwoods.
6 Tips to Help You Learn How to Turn Wood
- Start with softer wood like cherry or walnut. They are more forgiving and easier to work with for beginners.
- Add tools slowly. It is important to learn to use the cutting tools you have and set a solid foundation for your work. You do not need every cutting tool in the catalog.
- Avoid exotic wood at first. Exotic woods can be difficult to work with. Don't avoid them forever, but stick to readily available woods when learning. You may be surprised at how incredibly gorgeous walnut and maple can be!
- Learn to sharpen your tools. Sharp tools cut better and are safer to use than dull tools!
- Learn from a variety of sources. Gone are the days of needing a master-apprentice system, but if you can locate a mentor, that is an excellent resource! Read books, watch YouTube videos, and discover articles online. Always keep learning and your woodturning skills will keep improving.
- Experiment and keep trying! Discover how your cutting edge responds to different lathe speeds or a different piece of wood. Give yourself permission to try something new with your handheld tools and to fail at it.
Finally, whether you're crafting a delicate vase, a spindle for a staircase, or a simple keepsake, remember that the journey begins with the right lumber. Our premium hardwood turning blanks are available in 4/4, 5/4, and 6/4 sizes. They have very low defects and will perform wonderfully on your lathe.
Then please share your finished products with us on social media! We’d love to see your creations!
About the Author
 Josh Kou is the operations manager at North Castle Hardwoods. As a second-generation lumberman, he's the go-to guy for your woodworking questions. Read more about Josh.


